Selasa, 31 Oktober 2023

UTS DATABASE ADVANCED

Pembuatan Aplikasi Data Master Kasir dengan PHP & MongoDB


    Aplikasi Data Master Kasir adalah aplikasi sederhana yang memungkinkan pengguna untuk mengelola berbagai data yang berhubungan dengan operasi kasir, seperti kategori menu, menu, data pengguna, dan data pelanggan. Aplikasi ini dibangun dengan menggunakan PHP sebagai bahasa pemrograman utama dan MongoDB sebagai sistem basis data NoSQL.


Struktur Koleksi (Collection) dalam MongoDB:

1. Aplikasi kasir

   - _id: ID unik untuk setiap dokumen.

   - nama_kategori: Nama kategori untuk menu.


2. Kategori Menu

   - _id: ID unik untuk setiap dokumen.

   - id_kategori: ID kategori menu yang terkait.

   - nama_menu: Nama menu.

   - harga: Harga menu.


3. Pengguna

   - _id: ID unik untuk setiap dokumen.

   - username: Nama pengguna.

   - password: Kata sandi pengguna.

   - level: Level atau peran pengguna (misalnya, admin, kasir, atau pegawai).


4. Pelanggan

   - _id: ID unik untuk setiap dokumen.

   - nama: Nama pelanggan.

   - email: Alamat email pelanggan.

   - no_hp: Nomor telepon pelanggan.

   - alamat: Alamat pelanggan.


Fitur Aplikasi:

1. Tambah Data: Aplikasi memungkinkan pengguna untuk menambahkan data baru ke setiap koleksi. Contoh: Menambahkan kategori menu baru, menu baru, pengguna baru, atau pelanggan baru.


2. Hapus Data: Pengguna dapat menghapus data yang tidak lagi diperlukan dari setiap koleksi.


3. Edit Data (Opsional): Aplikasi dapat ditingkatkan dengan menambahkan fitur pengeditan data, yang memungkinkan pengguna untuk memperbarui informasi yang ada.


4. Tampilan Data: Aplikasi menampilkan data dalam bentuk tabel yang mudah dibaca, sehingga pengguna dapat melihat dan memahami informasi dengan cepat.


5. Navigasi: Terdapat menu navigasi yang memungkinkan pengguna beralih antara koleksi (kategori menu, menu, user, pelanggan) dengan mudah.


Navigasi Menu:

- Data Master Kategori Menu: Mengelola daftar kategori menu.

- Data Master Menu: Mengelola daftar menu beserta detailnya.

- Data Master User: Mengelola data pengguna aplikasi kasir.

- Data Master Pelanggan: Mengelola data pelanggan.


Nama+NIM pada Header Aplikasi:

Aplikasi ini mencakup informasi berupa "NAMA+NIM" pada header aplikasi. Informasi ini biasanya digunakan untuk menunjukkan pemilik atau pembuat aplikasi beserta identifikasi uniknya.


Catatan:

- Untuk menghubungkan aplikasi ini dengan MongoDB, pastikan MongoDB telah diinstal dan berjalan di komputer Anda.

- Anda juga perlu memastikan Anda telah menghubungkan aplikasi ini dengan basis data MongoDB yang sesuai dalam kode koneksi.


Hasil : 

1. Data Master Aplikasi Kasir


2. Data Master Kategori Menu


3. Data Master Pengguna


4. Data Master Pelanggan


Senin, 30 Oktober 2023

Functions Fundamental - Jupyter Notebook


Instructions

1. Compute the sum of a_list (already defined in the code editor) without using sum().

Initialize a variable named sum_manual with a value of 0.
Loop through a_list, and for each iteration add the current number to sum_manual.
Print sum_manual and sum(a_list) to check whether the values are the same.


2. Generate a frequency table for the ratings list, which is already initialized in the code editor.

Start by creating an empty dictionary named content_ratings.
Loop through the ratings list. For each iteration:
If the rating is already in content_ratings, then increment the frequency of that rating by 1.
Else, initialize the rating with a value of 1 inside the content_ratings dictionary.
Print content_ratings.


3. Recreate the square() function above and compute the square for numbers 10 and 16.
Assign the square of 10 to a variable named squared_10.
Assign the square of 16 to a variable named squared_16.


4. Create a function named add_10() that:

Takes a number as the input (name the input variable as you wish).
Adds the integer 10 to that number.
Returns the result of the addition.
Use the add_10() function to:

Add 10 to the number 30. Assign the result to a variable named add_30.
Add 10 to the number 90. Assign the result to a variable named add_90.


5. Recreate the square() function by omitting the variable assignment step inside the function's body.

Without typing out the name of the parameter, use the new square() function to compute the square of the numbers 6 and 11.

Assign the square of 6 to a variable named squared_6.
Assign the square of 11 to a variable named squared_11.


6. Write a function named extract() that can extract any column you want from the apps_data data set.

The function should take in the index number of a column as input (name the parameter as you want).
Inside the function's definition:

Create an empty list.
Loop through the apps_data data set (excluding the header). Extract only the value you want by using the parameter (which is expected to be an index number).
Append that value to the empty list.
Return the list containing the values of the column.
Use the extract() function to extract the values in the prime_genre column. Store them in a variable named genres. The index number of this column is 11.


7. Write a function named freq_table() that generates a frequency table for any list.

The function should take in a list as input.
Inside the function's body, write code that generates a frequency table for that list and stores the table in a dictionary.
Return the frequency table as a dictionary.
Use the freq_table() function on the genres list (already defined from the previous screen) to generate the frequency table for the prime_genre column. Store the frequency table to a variable named genres_ft.

Feel free to experiment with the extract() and freq_table() functions to easily create frequency tables for any column you want.


8. Write a function named freq_table() that generates a frequency table for any column in our iOS apps data set.

The function should take the index number of a column in as an input (name the parameter as you want).
Inside the function's body:
Loop through the apps_data data set (don't include the header row) and extract the value you want by using the parameter (which is expected to be an index number).
Build the frequency table as a dictionary.
The function should return the frequency table as a dictionary.
Use the freq_table() function to generate a frequency table for the user_rating column (the index number of this column is 7).
Store the table in a variable named ratings_ft.


9. Update the current freq_table() function to make it more reusable.

The function should take in two inputs this time: a data set and the index of a column (name the parameters as you want).
Inside the function's body:
Loop through the data set using that parameter which is expected to be a data set (a list of lists). For each iteration, select the value you want by using the parameter which is expected to be an index number.
Build the frequency table as a dictionary.
The function should return the frequency table as a dictionary.
Use the updated freq_table() function to generate a frequency table for the user_rating column (the index number of this column is 7). Store the table in a variable named ratings_ft.


10. Use the freq_table() function to generate frequency tables for the cont_rating, user_rating, and prime_genre columns.

Use positional arguments when you generate the table for the cont_rating column (index number 10). Assign the table to a variable named content_ratings_ft.
Use keyword arguments for the user_rating column (index number 7) following the order (data_set, index). Assign the table to a variable named ratings_ft.
Use keyword arguments for the prime_genre column (index number 11) following the order (index, data_set). Assign the table to a variable named genres_ft.


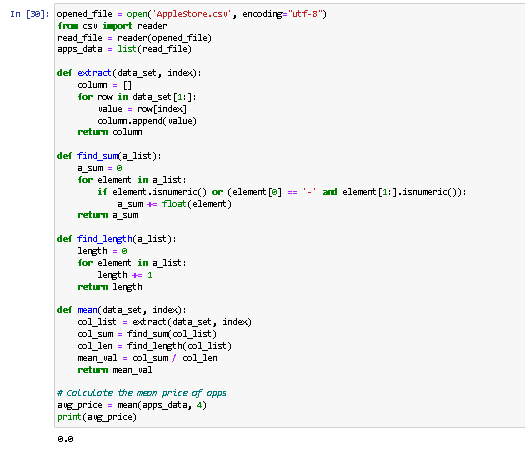
11. Write a function named mean() that computes the mean for any column we want from a data set.

The function should take in two inputs: a data set and an index value.
Inside the body of the mean() function, use the extract() function to extract the values of a column into a separate list, and then compute the mean of the values in that list using find_sum() and find_length().
The function should return the mean of the column.
Use the mean() function to compute the mean of the price column (index number 4). Assign the result to a variable named avg_price.


12. The code we provided in the code editor has several bugs (errors). Run the code, and then use the information provided in the tracebacks to debug the code.

Select all lines of code and press ctrl + / (PC) or ⌘ + / (Mac) to uncomment it so you can modify it.
For a demo of how this keyboard shortcut works, see this help article.
To understand what the bug is, read the general description of the error.
To understand where the bug is, follow the red arrows.
You'll see the arrows are represented as ---> or ^.
Note that there's more than one bug in the code we wrote. Once you debug an error, you'll get another error. This doesn't mean you're not making progress, on the contrary — you're closer to debugging the code completely.


Mengenal MongoDB For VSCode

    MongoDB adalah salah satu database NoSQL yang paling populer di dunia, digunakan oleh ribuan pengembang untuk menyimpan dan mengelola data mereka. MongoDB menawarkan fleksibilitas, skalabilitas, dan kinerja tinggi, menjadikannya pilihan utama untuk banyak aplikasi modern. Dalam upaya untuk memudahkan pengembangan dan administrasi database MongoDB, tim MongoDB merilis ekstensi MongoDB for Visual Studio Code.

Visual Studio Code (VSCode) adalah salah satu editor kode sumber terpopuler yang tersedia secara gratis. MongoDB for VSCode adalah ekstensi yang memungkinkan pengembang untuk terhubung ke database MongoDB, menjelajahi data, mengeksekusi query, dan mengelola koleksi data, semuanya tanpa perlu meninggalkan VSCode. Dalam artikel ini, kita akan menjelajahi bagaimana MongoDB for VSCode dapat memaksimalkan produktivitas Anda dalam pengembangan dan administrasi database MongoDB.


Instalasi MongoDB for VSCode

Langkah pertama adalah menginstal ekstensi MongoDB for VSCode. Ikuti langkah-langkah ini:

1. Buka Visual Studio Code.

2. Buka panel ekstensi dengan menekan `Ctrl+Shift+X` (atau `Cmd+Shift+X` pada macOS).

3. Cari "MongoDB for VSCode" dan instal ekstensi tersebut.

Setelah berhasil menginstal ekstensi ini, Anda siap untuk mulai menggunakan MongoDB for VSCode.


Menghubungkan ke Database MongoDB

Setelah Anda menginstal ekstensi MongoDB for VSCode, langkah selanjutnya adalah menghubungkan VSCode ke database MongoDB. Anda dapat melakukannya dengan mengikuti langkah-langkah berikut:

1. Buka tab "MongoDB" yang ada di panel kiri.

2. Klik tombol "Add Connection" dan masukkan informasi koneksi Anda, seperti URL MongoDB, nama koneksi, dan autentikasi jika diperlukan.

3. Klik "Connect" untuk menghubungkan VSCode ke database MongoDB.


Menjelajahi Koleksi Data

Setelah berhasil terhubung, Anda dapat menjelajahi koleksi data dalam database Anda. Ekstensi ini memungkinkan Anda untuk melihat dokumen dalam format yang mudah dibaca, dan Anda dapat mengklik dokumen untuk mengeditnya. Ini sangat berguna ketika Anda perlu memeriksa atau memperbarui data dalam database.


Mengeksekusi Query

MongoDB for VSCode juga memungkinkan Anda untuk mengeksekusi query MongoDB langsung dari VSCode. Anda dapat menulis query dalam bahasa MongoDB Query Language (MQL) dan melihat hasilnya dalam bentuk dokumen yang dapat diedit. Ini memudahkan pengujian query dan pengembangan fitur-fitur baru pada data yang ada.


 Menjalankan Agregasi

Selain itu, ekstensi ini mendukung operasi agregasi MongoDB. Anda dapat membangun dan menjalankan agregasi untuk menganalisis data Anda dengan mudah. Fitur ini sangat berguna untuk pengembang yang ingin mendapatkan wawasan mendalam dari data mereka.


Mengelola Index

Index adalah elemen penting dalam optimasi kinerja database MongoDB. MongoDB for VSCode memungkinkan Anda untuk mengelola indeks dalam koleksi Anda. Anda dapat membuat, menghapus, dan mengelola indeks dengan mudah melalui antarmuka yang nyaman.


Kuis

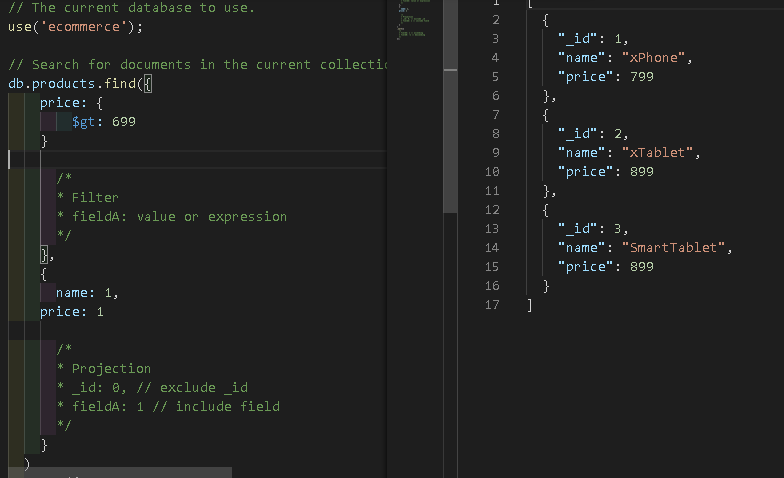
Berikut ini penggunaan MongoDB di VSCode :

Operator Pembanding

1. Operator $eq


2. Operatpr $gt


3. Operator $gte


Operator Logika

1. Operator  $and


2. Operator $or


3. Operator $not


4. Operator $exist


Selasa, 24 Oktober 2023

Dictionaries and Frequency Tables - Jupyter Notebook


Instructions

1. Store the data in the table above using two different lists.

Assign the list ['4+', '9+', '12+', '17+'] to a variable named content_ratings.
Assign the list [4433, 987, 1155, 622] to a variable named numbers.
Store the data in the table above using a list of lists. Assign the list [['4+', '9+', '12+', '17+'], [4433, 987, 1155, 622]] to a variable named content_rating_numbers.


2. Map content ratings to their corresponding numbers by recreating the dictionary above: {'4+': 4433, '9+': 987, '12+': 1155, '17+': 622}. Assign the dictionary to a variable named content_ratings.
Print content_ratings and examine the output carefully. Has the order we used to create the dictionary been preserved? In other words, is the output identical to {'4+': 4433, '9+': 987, '12+': 1155, '17+': 622}? We'll discuss more about this on the next screen.


3. Retrieve values from the content_ratings dictionary.

Assign the value at index '9+' to a variable named over_9.
Assign the value at index '17+' to a variable named over_17.
Print over_9 and over_17.


4. Use the new technique we learned to map content ratings to their corresponding numbers inside a dictionary.

Create an empty dictionary named content_ratings.
Add the index:value pairs one by one using the dictionary_name[index] = value technique. This should be the final form of the dictionary: {'4+': 4433, '9+': 987, '12+': 1155, '17+': 622}.
Retrieve the value at index 12+ from the content_ratings dictionary. Assign it to a variable named over_12_n_apps.


5. Create the following dictionary and assign it to a variable named d_1:
{'key_1': 'first_value',
'key_2': 2,
'key_3': 3.14,
'key_4': True,
'key_5': [4,2,1],
'key_6': {'inner_key' : 6}
}
2.Examine the code below and determine whether it'll raise an error or not. If you think it'll raise an error, then assign the boolean True to a variable named error, otherwise assign False.

{4: 'four',
1.5: 'one point five',
'string_key': 'string_value',
True: 'True',
[1,2,3]: 'a list',
{10: 'ten'}: 'a dictionary'}


6. Using the in operator, check whether the following values exist as dictionary keys in the content_ratings dictionary:

The string '9+'. Assign the output of the expression to a variable named is_in_dictionary_1.
The integer 987. Assign the output of the expression to a variable named is_in_dictionary_2.
Combine the output of an expression containing in with an if statement. If the string '17+' exists as dictionary key in content_ratings, then:

Assign the string "It exists" to a variable named result.
Print the result variable.


7. Count the number of times each unique content rating occurs in the data set.
Create a dictionary named content_ratings where the keys are the unique content ratings and the values are all 0 (the values of 0 are temporary at this point, and they'll be updated).
Loop through the apps_data list of lists. Make sure you don't include the header row. For each iteration of the loop:
Assign the content rating value to a variable named c_rating. The content rating is at index number 10 in each row.
Check whether c_rating exists as a key in content_ratings. If it exists, then increment the dictionary value at that key by 1 (the key is equivalent to the value stored in c_rating).
Outside the loop, print content_ratings to check whether the counting worked as expected.


8. Count the number of times each unique content rating occurs in the data set while finding the unique values automatically. Create an empty dictionary named content_ratings.
Loop through the apps_data list of lists (make sure you don't include the header row). For each iteration of the loop:
Assign the content rating value to a variable named c_rating. The content rating is at index number 10.
Check whether c_rating exists as a key in content_ratings.
If it exists, then increment the dictionary value at that key by 1 (the key is equivalent to the value stored in c_rating).
Else, create a new key-value pair in the dictionary, where the dictionary key is c_rating and the dictionary value is 1.
Outside the loop, print content_ratings to check whether the counting worked as expected.


9. Count the number of times each unique genre occurs.
Create an empty dictionary named genre_counting.
Loop through the apps_data list of lists (make sure you don't include the header row). For each iteration of the loop:
Assign the genre to a variable named genre. The genre comes as a string and has the index number 11.
Check whether genre exists as a key in genre_counting.
If it exists, then increment the dictionary value at that key by 1 (the key is equivalent to the value stored in genre).
Else, create a new key-value pair in the dictionary, where the dictionary key is genre and the dictionary value is 1.
Outside the loop, print genre_counting and try to determine what's the most common app genre in our data set.


10. Loop over the content_ratings dictionary and transform the frequencies to percentages. For every iteration of the loop:

Transform the dictionary value (the frequency) to a proportion by dividing it by the total number of apps.
Transform the updated dictionary value (the proportion) to a percentage by multiplying it by 100.
Find out the percentage of apps that have a content rating of '17+'. Assign your answer to a variable named percentage_17_plus.

Find out the percentage of apps that can be downloaded by a 15-year-old. Assign your answer to a variable named percentage_15_allowed.


11. Transform the frequencies inside content_ratings to proportions and percentages while creating separate dictionaries for each.

Assign the dictionary storing proportions to a variable named c_ratings_proportions.
Assign the dictionary storing percentages to a variable named c_ratings_percentages.
Optional challenge: try to solve this exercise using a single for loop (solution to this challenge provided).


12. Extract the values in the size_bytes column in a separate list.

Create an empty list named data_sizes.
Loop through apps_data (make sure you don't include the header row) and for every iteration:
Store the data size as a float in a variable named size (the index number for the data size is 2).
Append size to the data_sizes list.
Find out the minimum and the maximum app data size.

Assign the minimum value to a variable named min_size.
Assign the maximum value to a variable named max_size.


13. Begin by finding the minimum and maximum value in the rating_count_tot column.

Extract the values in the rating_count_tot column (index number 5) in a separate list (don't forget to convert to integer or float).
Find out the minimum and maximum value of that list using the min() and the max() commands.
Based on the minimum and maximum value you've found, choose a few intervals (try to choose five intervals or less).

We've disabled answer checking for this exercise to give you the freedom to choose the intervals you find suitable (there's not a fixed solution for this exercise). You can see the intervals we chose in the solution.
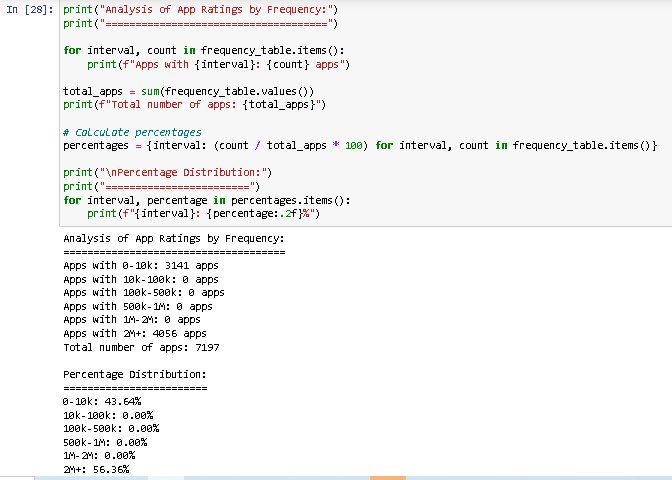
Once you've chosen the intervals, compute the frequency of apps for each interval. Store the frequency table in a dictionary.

Create a dictionary with intervals as dictionary keys and zeros as dictionary values.
Loop through the apps_data data set. Count the frequency of each interval using an if statement followed by a series of elif clauses.
Inspect the frequency table and analyze the results.


  Aplikasi CRUD dengan MongoDB-PHP 

Materi ini membahas pengembangan aplikasi CRUD (Create, Read, Update, Delete) dengan menggunakan bahasa pemrograman PHP dan MongoDB sebagai basis data. Mata kuliah "Database Advanced" diajarkan oleh pengampu Khamarudin Syarif. Aplikasi yang akan kita kembangkan adalah sebuah sistem perpustakaan yang memungkinkan pengguna untuk mengelola daftar buku dalam koleksi perpustakaan.


Deskripsi Aplikasi

Aplikasi CRUD ini akan memungkinkan pengguna untuk melakukan operasi tambah, edit, dan hapus data buku dalam perpustakaan. Data buku tersebut melibatkan informasi tentang judul buku dan tahun terbitnya.


Koneksi dengan MongoDB

Aplikasi ini akan terkoneksi langsung dengan basis data MongoDB. Untuk mengaktifkan koneksi PHP dengan MongoDB, Anda perlu mengunduh dan menginstal driver MongoDB PHP. Anda dapat mengikuti langkah-langkah berikut:


Download Driver MongoDB PHP:

- Unduh driver PHP MongoDB yang sesuai dengan versi PHP yang Anda gunakan di sini


Instalasi Driver MongoDB PHP:

1. Unduh driver PHP MongoDB yang sesuai dengan versi PHP Anda.

2. Pindahkan file `php_mongodb.dll` ke direktori `ext` dalam instalasi PHP (biasanya berada di `C:\xampp\php\ext` untuk pengguna XAMPP).

3. Edit file `php.ini` yang ada di `C:\xampp\php\php.ini`, dan tambahkan baris berikut di bagian ekstensi:

  extension=php_mongodb.dll


Cek Instalasi:

1. Setelah melakukan langkah-langkah di atas, restart layanan Apache pada XAMPP Control Panel.

2. Buka browser dan ketikkan `http://localhost/dashboard/phpinfo.php`.

3. Pastikan bahwa MongoDB sudah terdaftar pada hasil PHP Info.


Uji Koneksi dengan MongoDB

Anda dapat menguji koneksi dengan MongoDB dengan membuat skrip PHP sederhana sebagai berikut:

<?php

$manager = new MongoDB\Driver\Manager("mongodb://localhost:27017");

echo "Koneksi ke MongoDB berhasil.";

?>

Setelah membuat skrip tersebut, buka browser dan akses `http://localhost/mongodb/koneksi-mongodb.php`. Jika Anda melihat pesan "Koneksi ke MongoDB berhasil," itu berarti PHP telah berhasil terkoneksi dengan MongoDB.


Pembuatan Aplikasi CRUD

Aplikasi CRUD ini dibuat dalam folder `mongodb` pada direktori `C:\xampp\htdocs`. File `index.php` berisi seluruh logika aplikasi, termasuk tampilan dan operasi CRUD. Anda dapat melihat isi dari file `index.php` [di sini](https://docs.google.com/document/d/1JFlofE0BICnLb9-Cz3LtzWG-pgxNmyFJW3wpfrhK8GA/edit?usp=sharing).


Uji Coba CRUD

Setelah membuat aplikasi CRUD, Anda dapat menguji coba dengan membuka browser dan mengakses `http://localhost/mongodb/index.php`. Aplikasi ini memungkinkan Anda untuk menambah, mengedit, dan menghapus data buku dalam koleksi perpustakaan.


Kuis

Kuis yang diberikan adalah untuk membuat basis data baru pada MongoDB dengan nama "polibest" dan koleksi "mahasiswa" yang memiliki atribut "nim," "nama," "email," dan "alamat." Setelah itu, Anda diminta untuk membuat aplikasi CRUD dengan PHP untuk mengelola data mahasiswa dalam koleksi tersebut.

Langkah-langkah untuk memasukkan koding PHP dalam aplikasi CRUD MongoDB-PHP ke dalam dokumen HTML Anda adalah sebagai berikut:

1. Buka Editor HTML: Buka editor HTML atau teks pilihan Anda, seperti Visual Studio Code.

2. Buat Folder Baru: Buat folder mongodb pada direktori C:\xampp\htdocs baru dengan ekstensi `.php`. Misalnya, simpan berkas dengan nama `index.php`.

3. Salin & Tempel Kode: Salin seluruh kode PHP dibawah ini dan tempel ke `index.php`.

<!DOCTYPE html>
<html>
<head>
    <title>Aplikasi CRUD Mahasiswa</title>
</head>
<body>
    <h1>Aplikasi CRUD Mahasiswa</h1>

    <?php
    // Inisialisasi koneksi MongoDB
    try {
        $mongo = new MongoDB\Driver\Manager("mongodb://localhost:27017");
        $database = "polibest";
    } catch (MongoDB\Driver\Exception\Exception $e) {
        echo "Koneksi MongoDB gagal: " . $e->getMessage();
        exit;
    }

    if (isset($_POST['tambah'])) {
        // Operasi tambah mahasiswa
        $nim = $_POST['nim'];
        $nama = $_POST['nama'];
        $email = $_POST['email'];
        $alamat = $_POST['alamat'];

        $bulk = new MongoDB\Driver\BulkWrite;
        $bulk->insert(['nim' => $nim, 'nama' => $nama, 'email' => $email, 'alamat' => $alamat]);

        $result = $mongo->executeBulkWrite("$database.mahasiswa", $bulk);
        if ($result) {
            header("Location: index.php");
        }
    } elseif (isset($_GET['hapus'])) {
        // Operasi hapus mahasiswa
        $id = new MongoDB\BSON\ObjectId($_GET['hapus']);

        $bulk = new MongoDB\Driver\BulkWrite;
        $bulk->delete(['_id' => $id]);

        $result = $mongo->executeBulkWrite("$database.mahasiswa", $bulk);
        if ($result) {
            header("Location: index.php");
        }
    } elseif (isset($_POST['edit'])) {
        // Operasi edit mahasiswa
        $id = new MongoDB\BSON\ObjectId($_POST['id']);
        $nim = $_POST['nim'];
        $nama = $_POST['nama'];
        $email = $_POST['email'];
        $alamat = $_POST['alamat'];

        $bulk = new MongoDB\Driver\BulkWrite;
        $bulk->update(['_id' => $id], ['$set' => ['nim' => $nim, 'nama' => $nama, 'email' => $email, 'alamat' => $alamat]]);

        $result = $mongo->executeBulkWrite("$database.mahasiswa", $bulk);
        if ($result) {
            header("Location: index.php");
        }
    }
    ?>

    <h2>Tambah Mahasiswa</h2>
    <form method="post" action="index.php">
        <label for="nim">NIM:</label>
        <input type="text" name="nim" required>
        <label for="nama">Nama:</label>
        <input type="text" name="nama" required>
        <label for="email">Email:</label>
        <input type="email" name="email" required>
        <label for="alamat">Alamat:</label>
        <input type="text" name="alamat" required>
        <button type="submit" name="tambah">Tambah</button>
    </form>

    <h2>Daftar Mahasiswa</h2>
    <table border="1">
        <tr>
            <th>NIM</th>
            <th>Nama</th>
            <th>Email</th>
            <th>Alamat</th>
            <th>Aksi</th>
        </tr>
        <?php
        $query = new MongoDB\Driver\Query([]);
        $result = $mongo->executeQuery("$database.mahasiswa", $query);

        foreach ($result as $mahasiswa) {
            echo "<tr>";
            echo "<td>" . $mahasiswa->nim . "</td>";
            echo "<td>" . $mahasiswa->nama . "</td>";
            echo "<td>" . $mahasiswa->email . "</td>";
            echo "<td>" . $mahasiswa->alamat . "</td>";
            echo "<td><a href='index.php?edit=" . $mahasiswa->_id . "'>Edit</a> | <a href='index.php?hapus=" . $mahasiswa->_id . "'>Hapus</a></td>";
            echo "</tr>";
        }
        ?>
    </table>

    <?php
    if (isset($_GET['edit'])) {
        $id = new MongoDB\BSON\ObjectId($_GET['edit']);
        $query = new MongoDB\Driver\Query(['_id' => $id]);
        $result = $mongo->executeQuery("$database.mahasiswa", $query);

        foreach ($result as $mahasiswa) {
    ?>
            <h2>Edit Mahasiswa</h2>
            <form method="post" action="index.php">
                <input type="hidden" name="id" value="<?php echo $mahasiswa->_id; ?>">
                <label for="nim">NIM:</label>
                <input type="text" name="nim" value="<?php echo $mahasiswa->nim; ?>" required>
                <label for="nama">Nama:</label>
                <input type="text" name="nama" value="<?php echo $mahasiswa->nama; ?>" required>
                <label for="email">Email:</label>
                <input type="email" name="email" value="<?php echo $mahasiswa->email; ?>" required>
                <label for="alamat">Alamat:</label>
                <input type="text" name="alamat" value="<?php echo $mahasiswa->alamat; ?>" required>
                <button type="submit" name="edit">Simpan Perubahan</button>
            </form>
    <?php
        }
    }
    ?>
</body>
</html>


4. Simpan Perubahan: Simpan perubahan yang telah Anda bat (misalnya, `index.php`).

5. Tes Aplikasi: Buka aplikasi dalam peramban web Anda dengan mengakses alamat `http://localhost/mongodb/index.php`. Anda dapat menguji operasi CRUD pada aplikasi tersebut.

6. Hasil:


Terima kasih, semoga bermanfaat!


install mutillidae

 SEKEDAP